One of the most overlooked but critical aspects of your EPF account is nominating the right person to receive your funds in case of your demise. With EPFO mandating the process to be done online through the UAN portal, here’s everything you need to know to file, edit, or validate your EPF e-nomination.
Why e-Nomination Matters
- Helps your family access your EPF corpus without delays.
- Avoids disputes in case of multiple family claimants.
- Required for smooth processing of withdrawal, pension, and insurance claims.
- EPFO services like claim filing may be restricted if nomination is missing.
If you want to understand why EPFO has made this a hard requirement rather than a suggestion, our companion post, EPF e-Nomination is Now Mandatory: EPFO's New Rule You Can't Ignore, covers the enforcement side in detail. This guide focuses on the "how," that one covers the "why."
EPF Scheme 2026: Is Your Old Nomination Still Valid?
The Employees' Provident Funds Scheme, 2026 was notified by the Ministry of Labour and Employment and came into force from 1 July 2026, replacing the EPF Scheme of 1952. Under paragraph 44(3) of the new scheme, any nomination filed under the erstwhile 1952 scheme is treated as void to the extent it is inconsistent with the current one. [Gazette notification number to be added on verification.]
In practice, this means:
- If you filed your nomination years ago and never updated it, EPFO may no longer honour it as-is.
- A fresh nomination filing under the 2026 scheme is the only way to be certain your family's claim will not be delayed at the worst possible time.
- Employers are being asked to run internal re-filing drives, but individual members should not wait for HR to prompt them.
If you are unsure whether your existing nomination still counts, the safest move is to log in and file a fresh one using the steps below. It takes about ten minutes and immediately supersedes anything filed earlier.
Step 0: Mandatory KYC and Profile Checks Before You Start
Before you attempt filing the e-nomination, ensure that your UAN account is KYC-compliant. The following must be correctly updated:
| Field | Mandatory for Filing |
|---|
| Name (as per Aadhaar) | Yes |
| Date of Birth | Yes |
| Gender | Yes |
| Father's/Husband's Name | Yes |
| Marital Status | Yes |
| Aadhaar & Mobile linked | Yes |
| Photograph uploaded | Yes |
If any of these are incorrect, update them through your employer or raise a joint declaration before proceeding.
Who Can Be Nominated?
- Spouse, children, dependent parents: Most common nominees.
- You can assign one or multiple nominees, with a defined percentage share.
- If you don’t have a family, you may nominate anyone. But this becomes invalid once a family is acquired.
- Only family members can be nominated for pension purposes.
Checklist Before Filing (EPFO Rulebook)
| Relationship | Mandatory to Add? | Aadhaar Required | Remarks |
|---|
| Spouse | Yes | Yes | Mandatory if married |
| Dependent Mother | Optional | Yes | Advisable to add |
| Dependent Father | Optional | Yes | Advisable to add |
| Son(s) | Optional | Yes | Define % share |
| Daughter(s) | Optional | Yes | Define % share |
| Widow Mother | Optional | Yes | Female members only |
| Husband's Dependent Mother | Optional | Yes | Female members only |
EPFO advises members to nominate all eligible family members and specify share (%) for each.
Step-by-Step Process to File e-Nomination
Step 1: Log in to the EPFO Member Portal
- Visit unifiedportal-mem.epfindia.gov.in
- Enter your UAN, password, and captcha to log in.
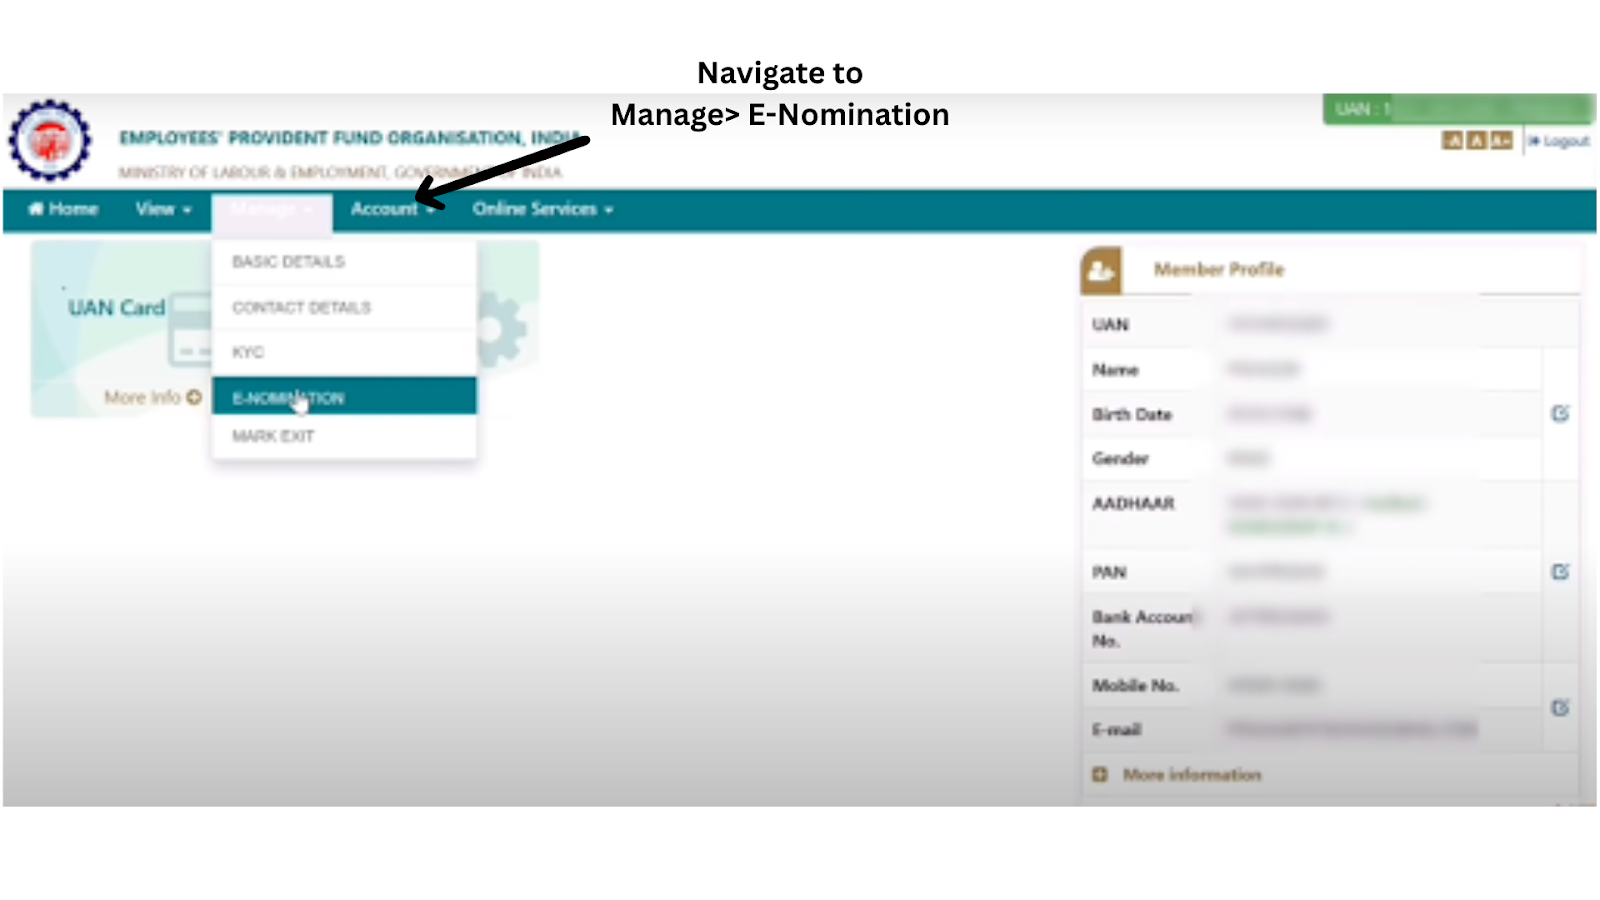
Step 2: Navigate to ‘e-Nomination’
- From the top menu, go to ‘Manage’ → ‘e-Nomination’
- This opens your profile data.
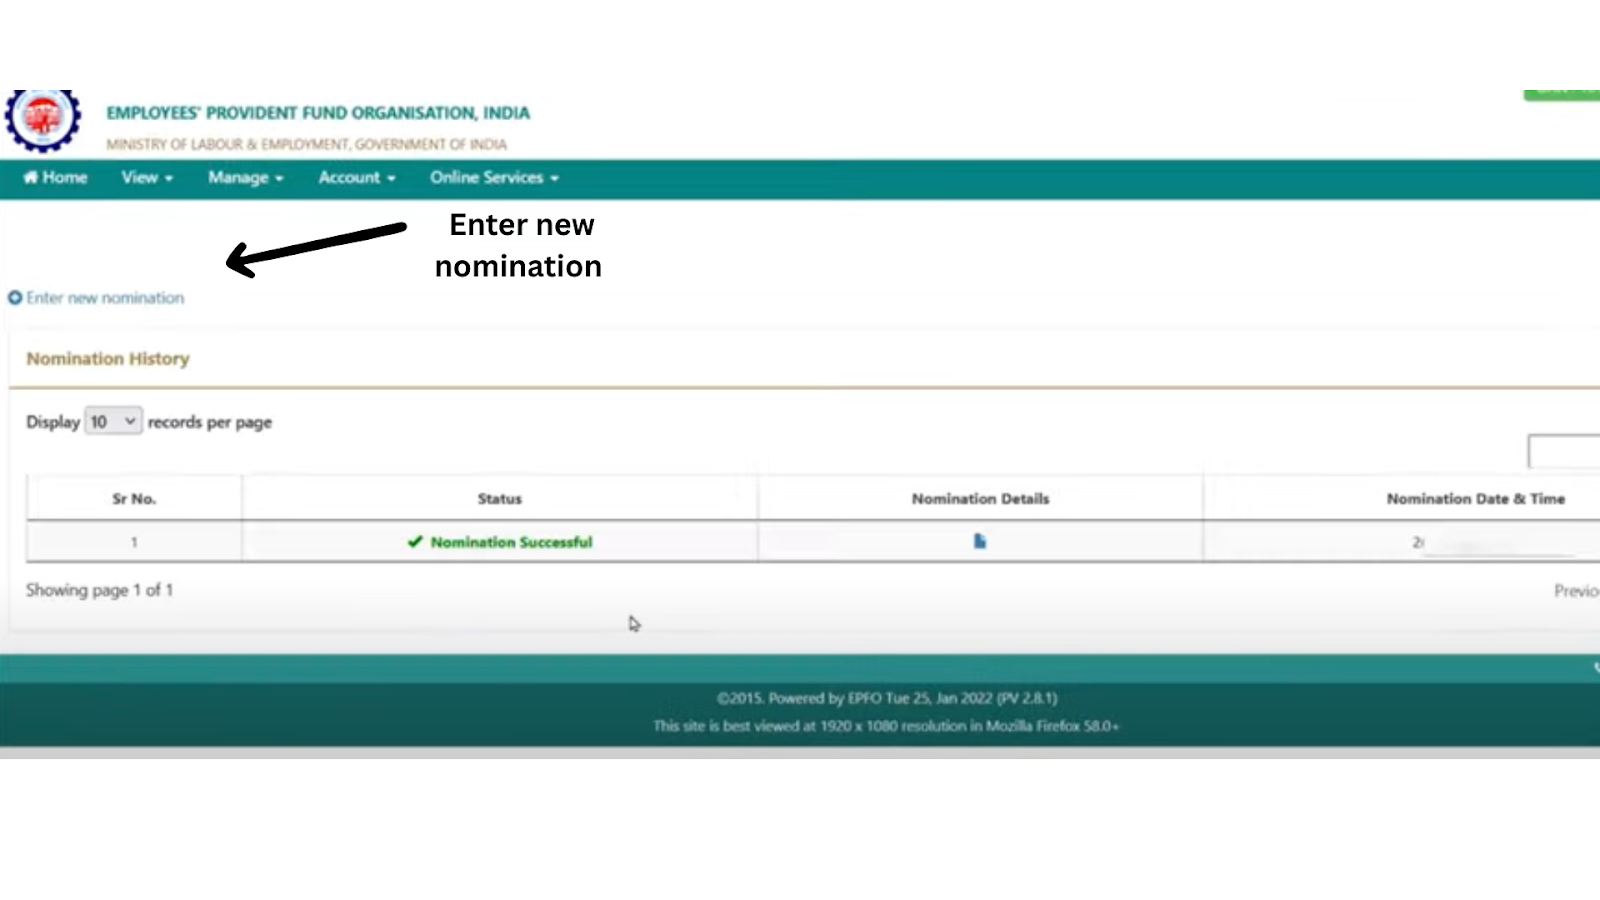
Note: If your KYC like Aadhaar, DOB, and Gender is incomplete or mismatched, the nomination screen won’t load. You will have to update these details through your employer before proceeding.
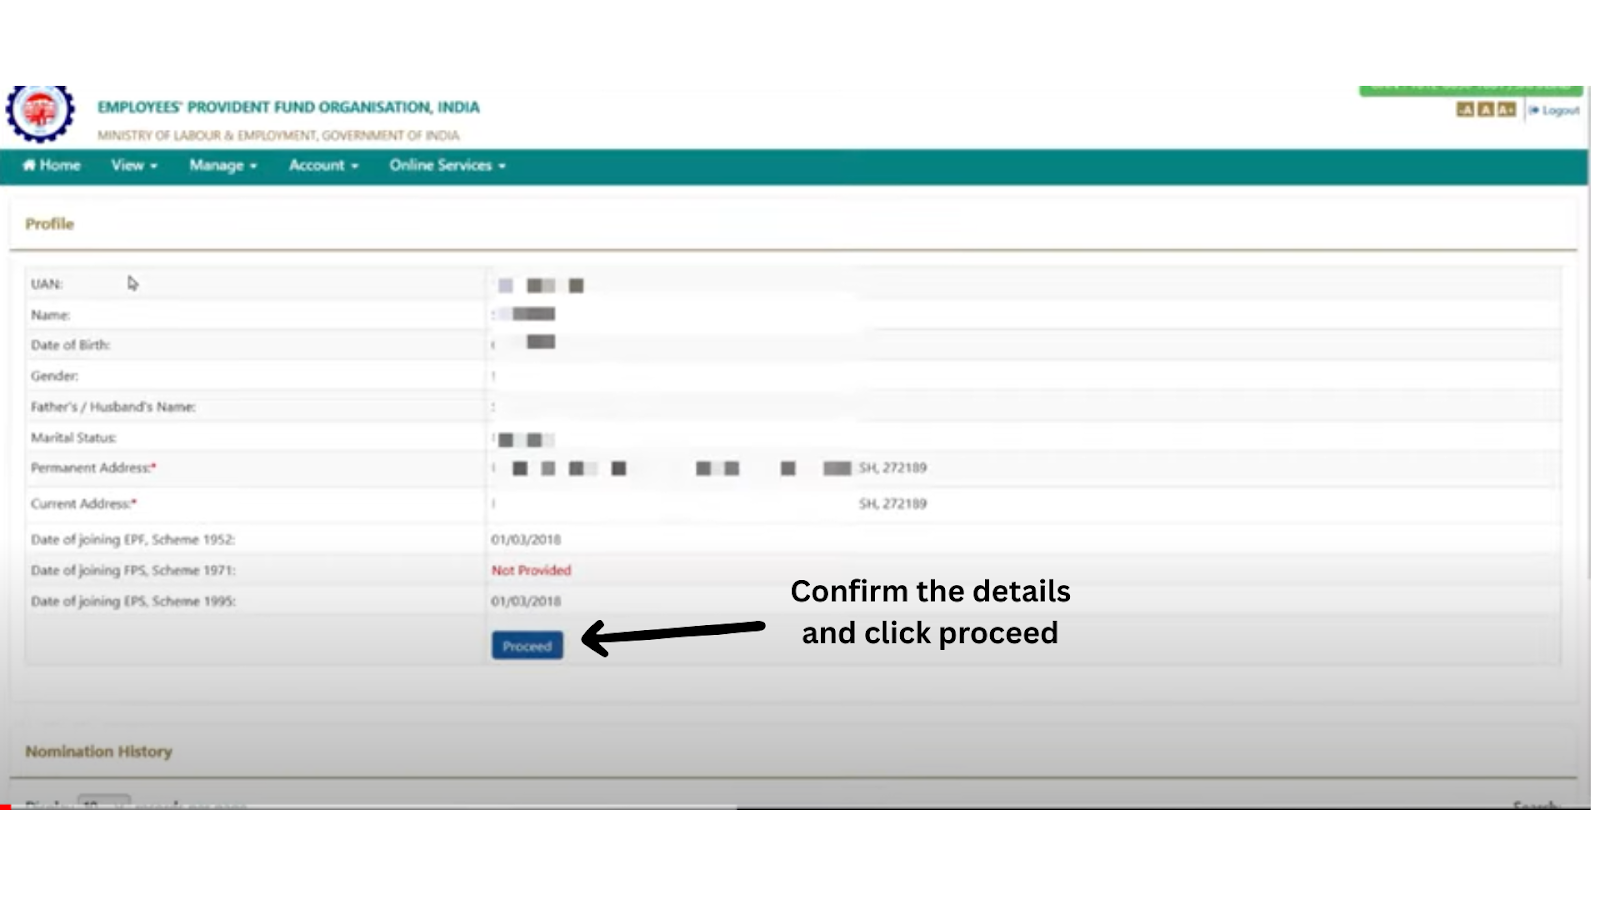
Step 3: Click ‘Proceed’
If your basic KYC is correct, you’ll be shown your profile screen (with photo and basic details).
Click ‘Proceed’ to continue with e-Nomination.
Step 4: Declare Your Family Status
You’ll be asked:
"Do you have a family?"
Click:
- ‘Yes’ if you have a spouse, children, or dependent parents.
- ‘No’ if you don’t (you’ll only be allowed to nominate one person,and it becomes void once you get married or have dependents).

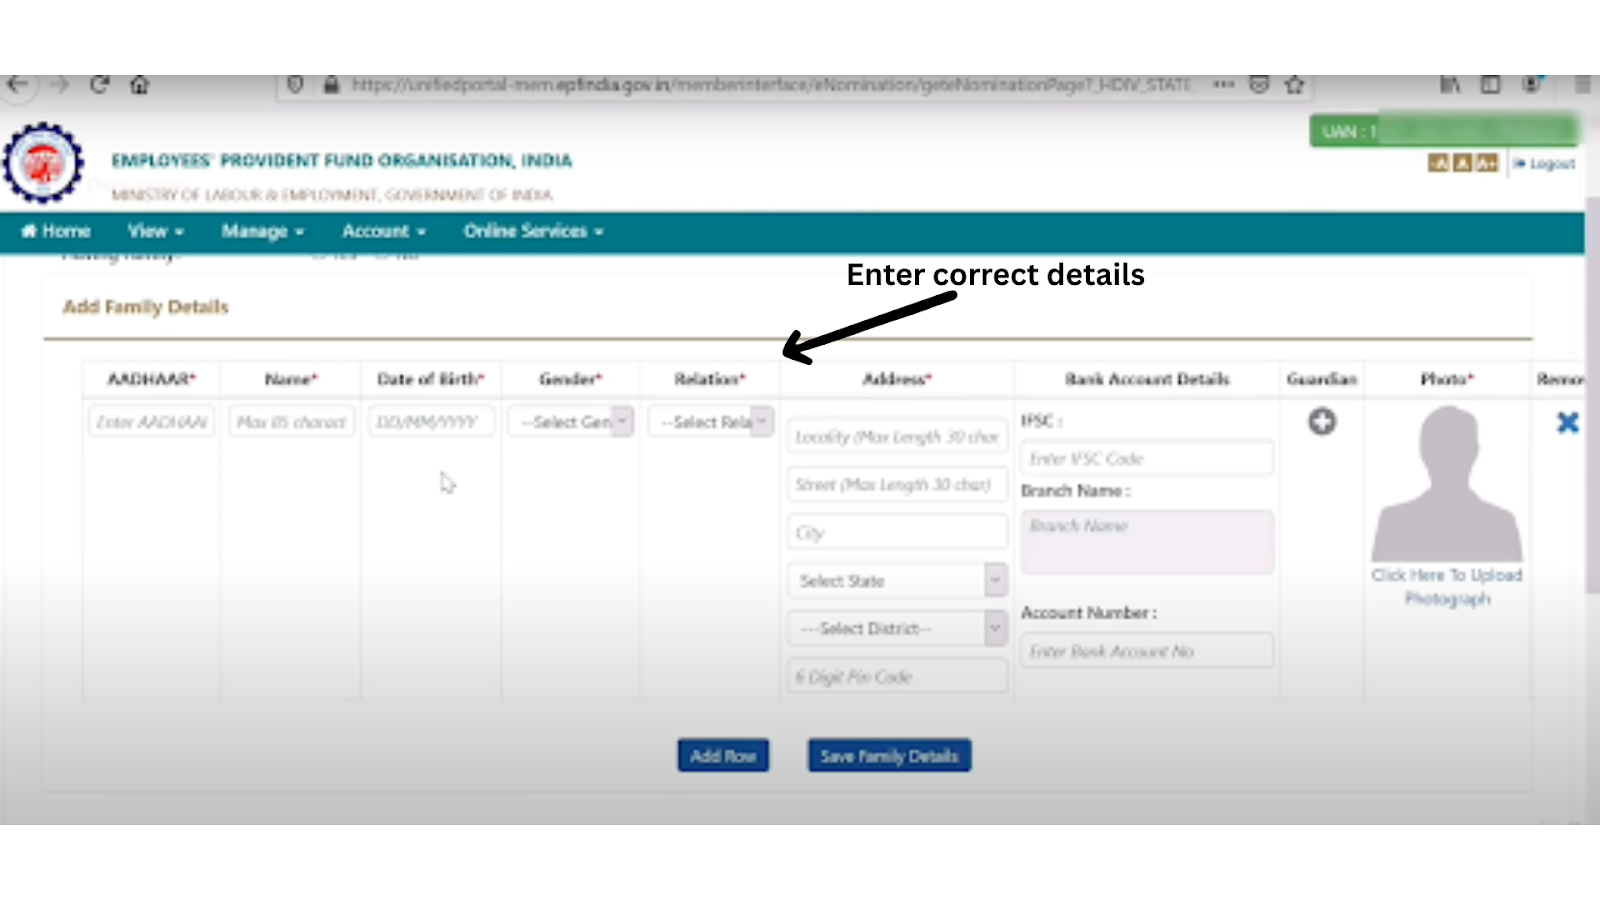
Step 5: Add Family Member Details
Enter each family member's:
- Full name
- Date of birth
- Gender
- Relation
- Aadhaar number (optional but recommended)
- Address
Click ‘Add Row’ to include multiple members.
Step 6: Save Family Details
After entering details for all nominees, click ‘Save Family Details’.
You’ll now be redirected to assign nominee shares.
Step 7: Set EPF Nominee Share
Now you’ll assign what % of your EPF balance goes to each family member.
For example:
- Spouse: 50%
- Child: 25%
- Parent: 25%
Total should be exactly 100%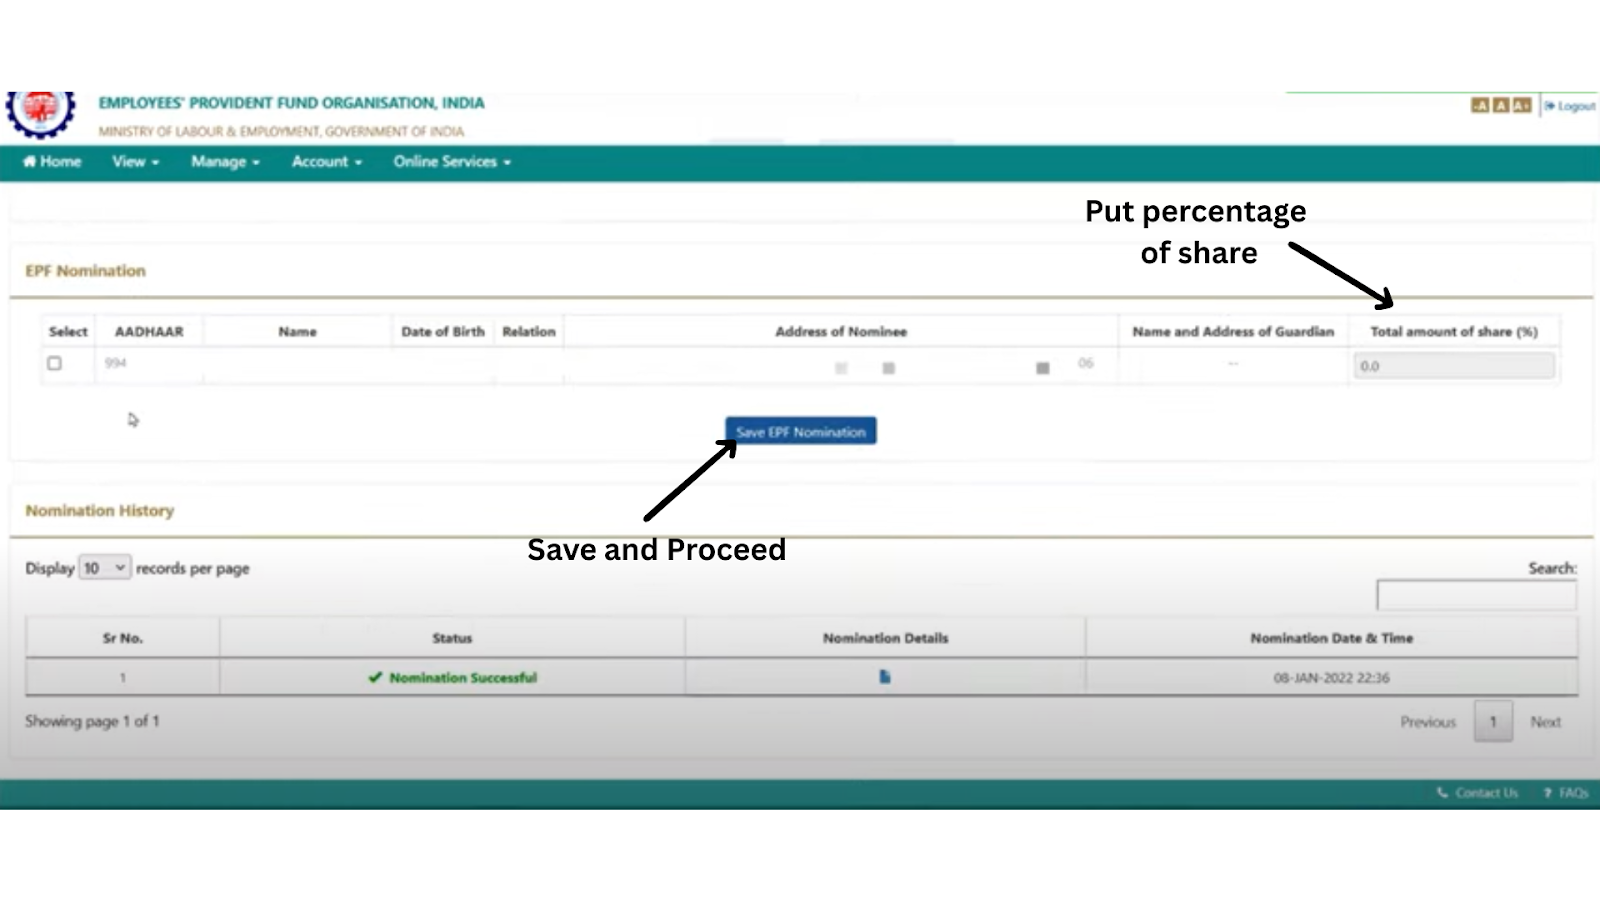
Now, File Your EPS Nomination
This step is mandatory and often missed.
After completing your EPF nomination, you must now submit nomination for your EPS (Employees' Pension Scheme).
Follow the same process again:
Step 8: Add Family Members
Re-enter details for each family member:
- Name
- Date of Birth (DOB)
- Gender
- Relationship
- Aadhaar Number (optional but recommended)
- Address
Click ‘Add Row’ to include multiple members.
Step 9: Save Family Details
Click ‘Save Family Details’ to move to the share allocation screen.
Step 10: Set EPS Nominee Share
Assign what percentage of your EPS corpus goes to each nominee.
Make sure the total adds up to 100%.
Step 11: Save EPS Nomination
Click ‘Save EPS Nomination’ to save the draft.
✅ Done! You can now proceed to e-Sign this nomination as well to complete the process.
EPF Nomination vs EPS Nomination: Are They the Same?
No, and this is a common source of confusion. Your EPF nomination decides who receives your provident fund balance and EDLI insurance payout. Your EPS nomination separately decides who receives pension-related benefits under the Employees' Pension Scheme. EPFO treats them as two distinct filings within the same session, which is why the portal asks you to repeat the family and share details for EPS even if you just finished doing it for EPF. Skipping the EPS step is one of the most common reasons families later discover a nomination is "incomplete."
Step 12: Confirm Nomination
After assigning the nominee share, click ‘Save EPF/EPS Nomination’.
Your entry is saved as a draft. Now you need to e-Sign to validate.
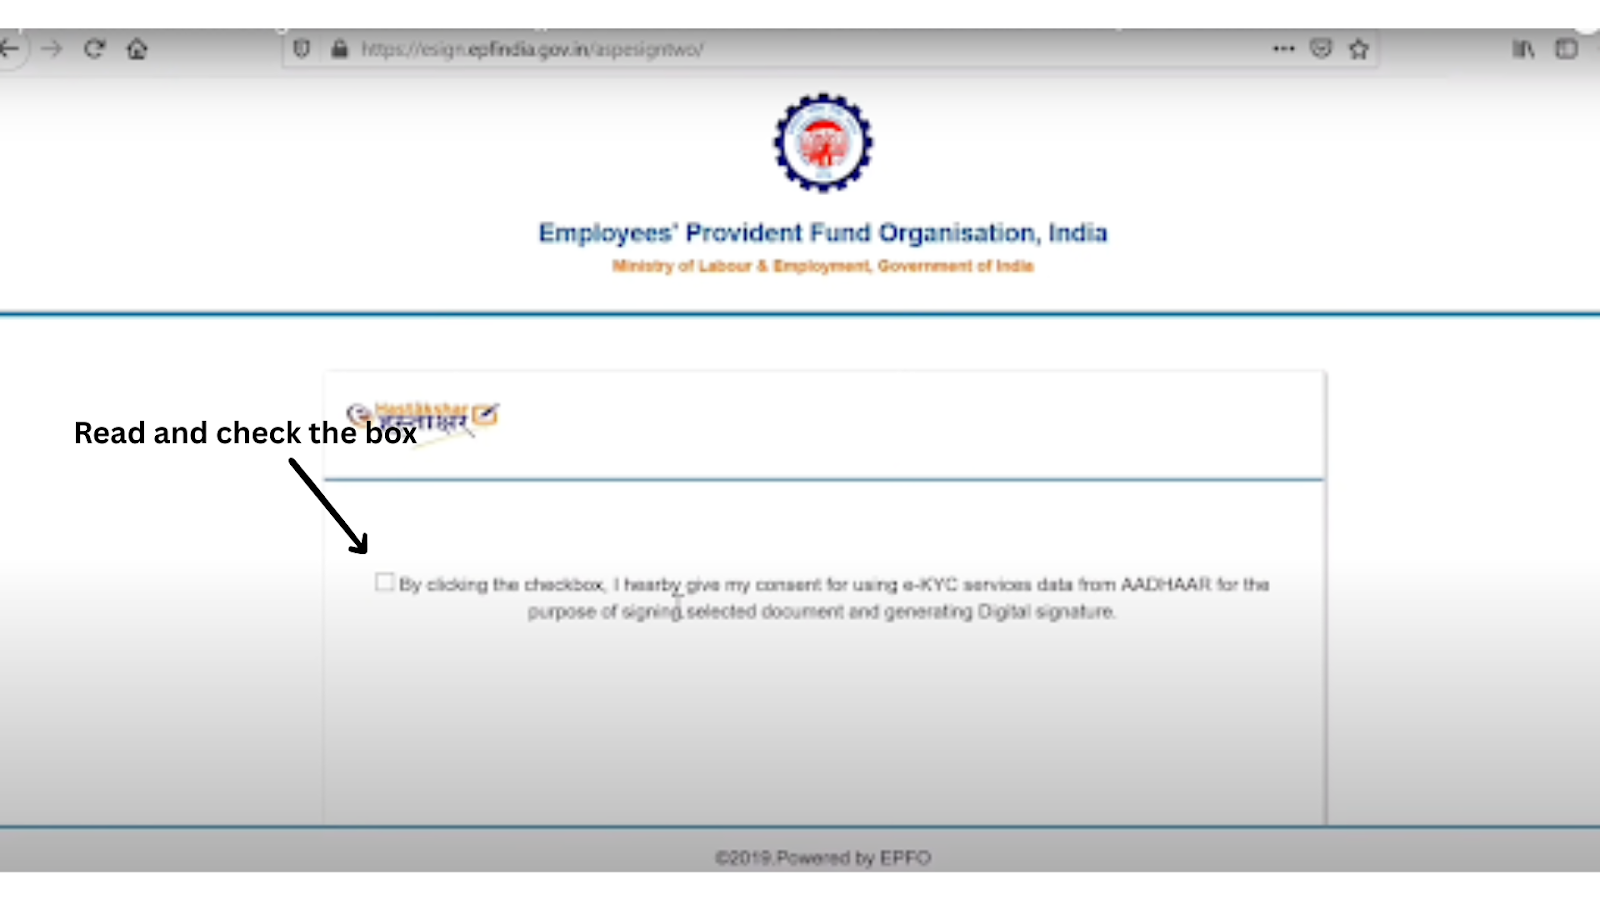
Step 13: Click on e-Sign
Click the e-Sign button. You’ll be redirected to the Aadhaar authentication screen.
You’ll be given two options:
- Use Aadhaar number
- Use Virtual ID (VID)
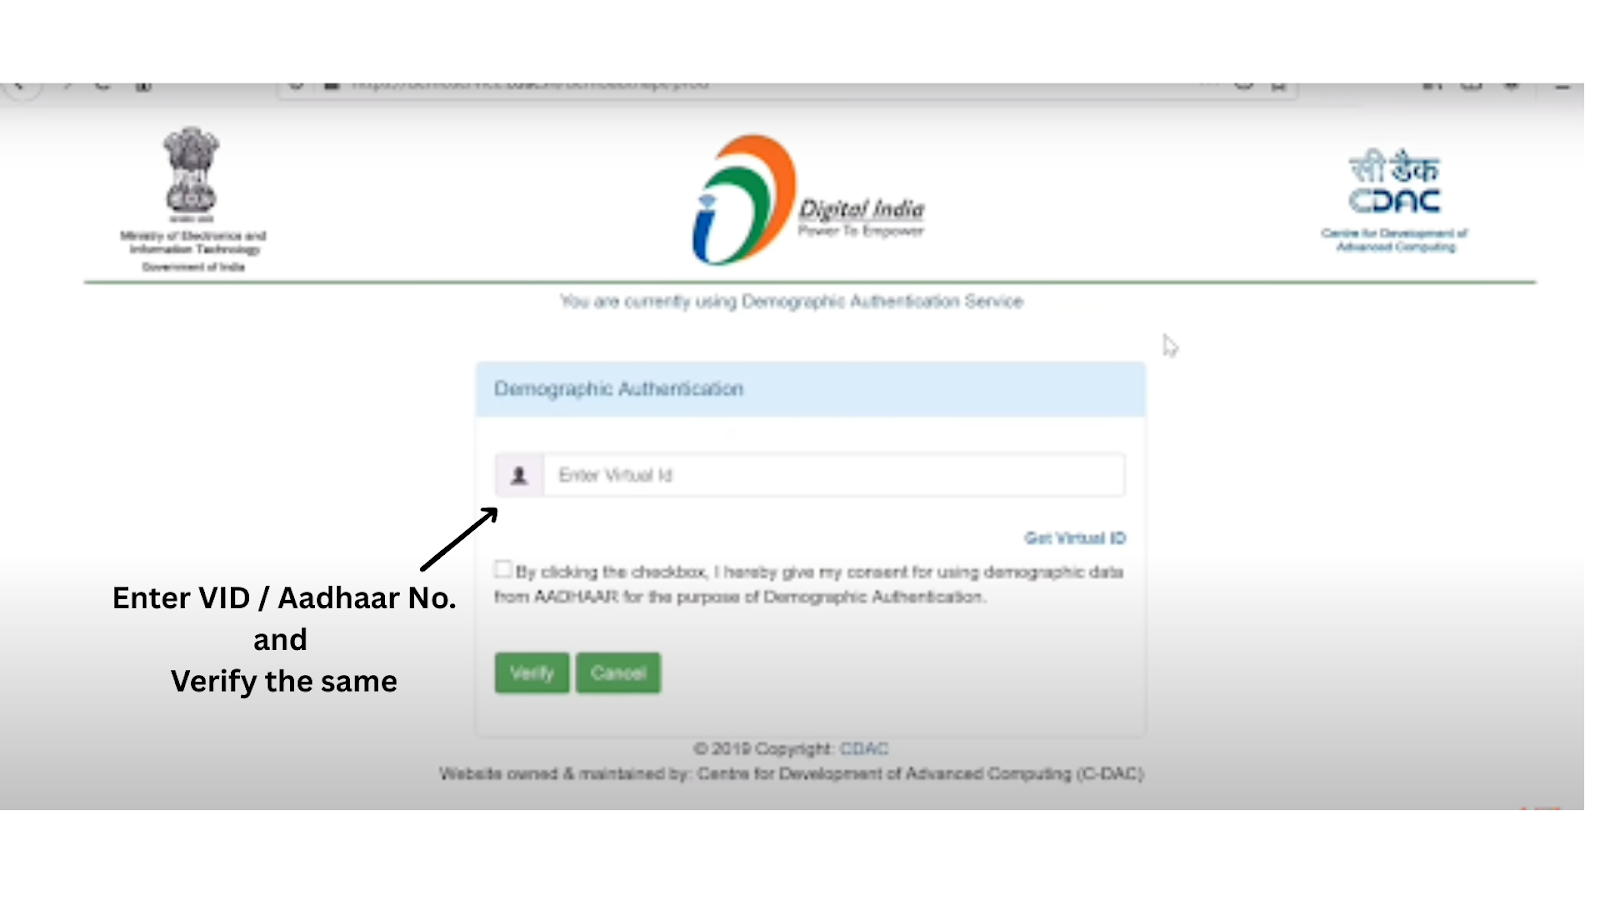
Step 14: Enter Aadhaar or VID
Enter your 12-digit Aadhaar number or 16-digit VID, and proceed.
Step 15: Verify via OTP
You’ll receive an OTP on your Aadhaar-linked mobile number.
Enter the OTP to verify. If it matches, your nomination details will be digitally signed.
Step 16: Confirmation
You’ll get a confirmation message on the screen that your e-nomination has been successfully recorded.
You can now view, download, or update your e-nomination any time by revisiting the same portal.
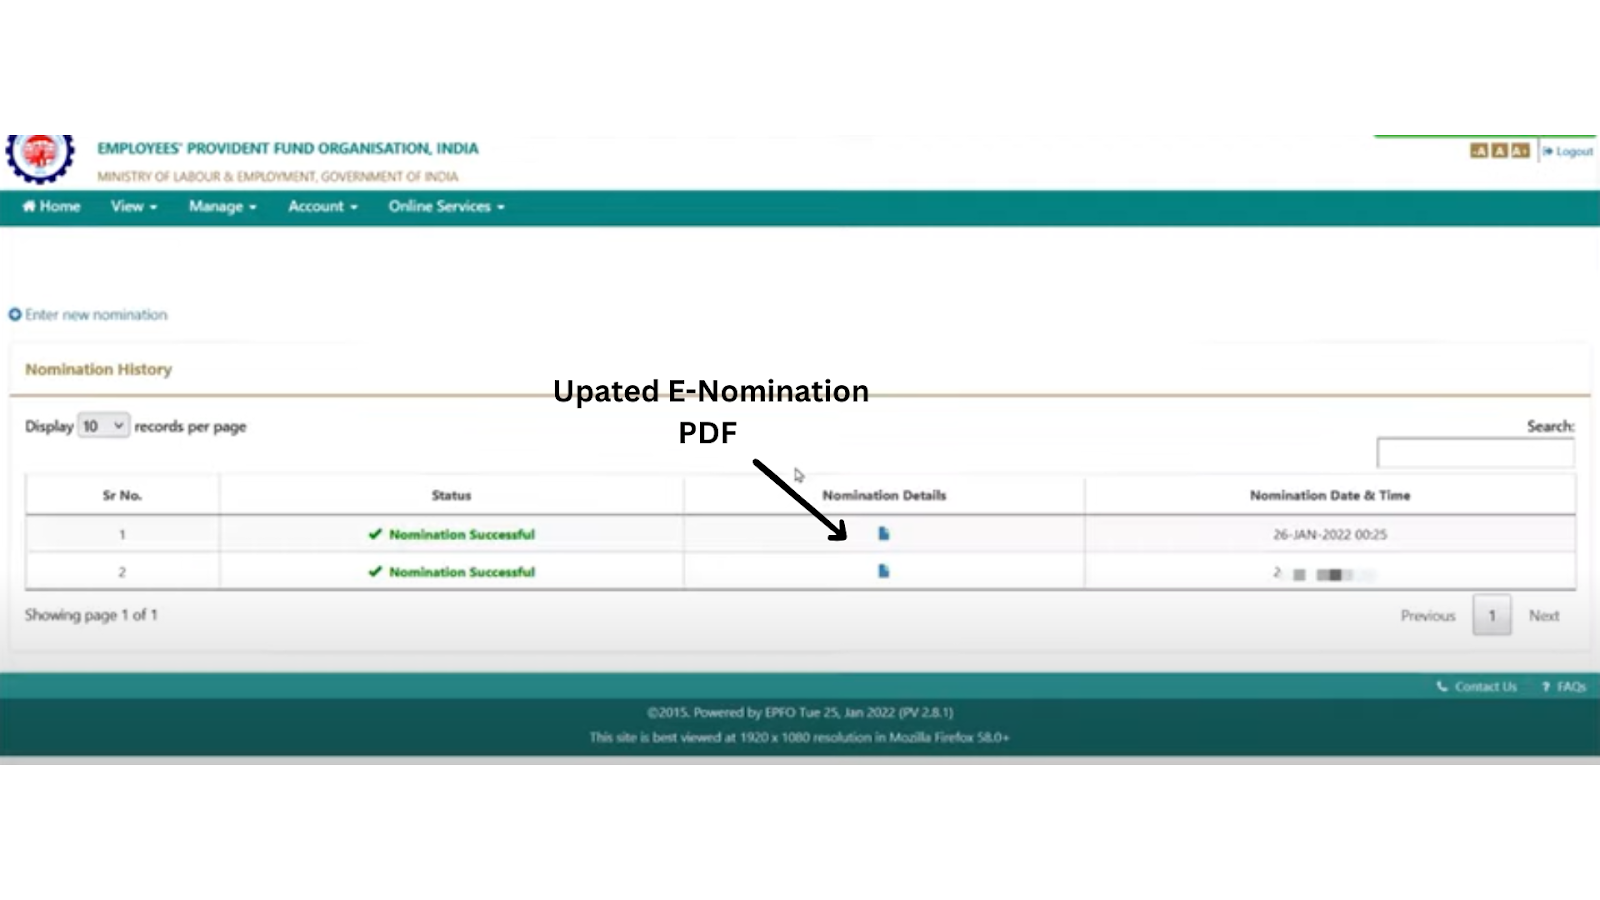
How to Verify Your e-Nomination Was Successful
Do not assume the process is complete just because you did not see an error. To confirm your e-nomination actually went through:
- Log back in to the UAN Member Portal and go to Manage, then e-Nomination.
- Check the 'Nomination History' section. A successfully filed nomination will show a completed or confirmed status against your latest submission.
- If it still shows as pending or in draft, your e-Sign did not go through. Repeat Steps 13 to 15.
- Where available, download the nomination confirmation for your own records; keep a copy outside the portal as well.
EPF e-Nomination Not Working? Common Fixes
| Problem | Likely Cause | Fix |
|---|
| Nomination screen will not load | 8KYC incomplete or mismatched (Aadhaar, DOB, gender) | Update via employer or a joint declaration, then retry |
| e-Sign OTP not received | Mobile number not linked to Aadhaar, or network delay | Confirm Aadhaar-linked mobile with UIDAI, wait a few minutes, retry |
| Share percentages rejected | Total does not add up to exactly 100% | Recalculate and re-enter shares for all nominees |
| Portal times out or throws an error mid-session | Server load during the post-migration stabilisation window | Retry after some time; avoid repeated resubmissions in quick succession |
| Nomination shows as saved but not confirmed | e-Sign step was skipped after saving the draft | Go back to 'Pending Nomination' and complete e-Sign |
How to Edit or Change Your Nomination
You can edit your e-nomination any time by re-submitting the form:
- Login → Manage → e-Nomination
- Click Add New Nomination
- e-Sign again to make it official
Your latest submission overrides the previous one.
This is especially useful when:
- A new family member is born
- There is a change in marital status
- You wish to redistribute shares
Conclusion
Filing your e-nomination is one of the fastest, highest-impact updates you can make to your EPF account, and under EPF Scheme 2026 it is worth re-checking even if you did this years ago. For a deeper look at why EPFO is enforcing this so strictly, read EPF e-Nomination is Now Mandatory: EPFO's New Rule You Can't Ignore. If you are also preparing for a withdrawal, our PF Withdrawal Rules under EPFO 3.0 guide is a natural next read, since a clean nomination record helps that process go smoothly too.
Not sure whether your existing nomination still holds, or want a second pair of eyes before you e-Sign?
Check Your PF Withdrawability or Book a Free Consultation with our EPF experts.
Have questions or want to stay updated on EPF changes? Join the conversation on Reddit, X, Instagram, LinkedIn, Facebook, or YouTube.